

Best Yosemite Day Hikes, Camping, & More!
There are tons of hikes in Yosemite, but the best Yosemite Day Hikes are limited to just a few. Some challenge you then reward your efforts while others are laid back and are kind of just, “Hey dude, walk in this pretty forest on a flat paved path for 10 minutes and then there’s a sweet waterfall for you to take pictures with.”
In all seriousness, the park really deserves a full week, or even two, if you can spare it. But most of us may only be able to swing through for a couple days on a camping trip. That’s essentially what this entry will cover. No matter how much time you’re able to spend at Yosemite National Park, it is guaranteed to be one of the most beautiful and memorable trips you ever take.
Bottom Line Up Front:
- www.Recreation.gov to reserve camping spots (do it in advance)
- Upper or Lower Pines is the best place to camp (right near John Muir/Mist Trail trailheads)
- Bridalveil Falls & Lower Yosemite Falls = mostly flat, easy hikes, 1-2 hrs each
- Mist Trail = more difficult, but worth the effort to see both Vernal Falls and Nevada Falls, plan for 4-7 hrs depending on fitness (bring poncho in spring/summer)
- Glacier Point is best outlook of whole park, 45-60 min drive from Valley - do it first or last!
- Half dome is full day hike, requires permit, apply in March! (Recreation.gov)
- Several groves of Giant Sequoia trees -- driving required (45 min) - Mariposa grove is the best (in our opinion)
A logical itinerary for a day or two is as follows: choose whether you want to see the whole park from Glacier Point on the drive in or the drive out. It really doesn’t make sense to head there during the middle of your visit considering it can take about an hour to drive up there. Once you’re in the valley, set up camp (if you’re camping), and choose to either jump on the Mist Trail or head to the flat/easy hikes of Bridalveil and Lower Yosemite Falls. You can accomplish both of the easy/flat hikes in a half day, or walk the Mist Trail all the way to Nevada Falls in a half day (this trial is more challenging, so choose accordingly). That will end your first day. On the second day, tackle the remaining trails and plan to head up to Glacier Point if you haven’t seen it yet. If time allows, drive over to one of the groves to see the Giant Sequoia trees (we recommend Mariposa grove). This overall schedule will allow you to see some of the main attractions of Yosemite and get in some decent hiking.
If you haven’t already seen the video, take a look below. It covers most of the points mentioned above, but will give you a decent visual of what to expect.
Camping at Yosemite:
I’ll be completely upfront and honest: I’ve never really enjoyed camping. I don’t know why, I think it’s because I never really saw the point. Every camping trip has been us intentionally making ourselves less comfortable to be closer to ‘nature’ when the entire experience could have been exactly the same even if we’d gone home after the day’s adventures or had a hotel (I do understand that camping is less expensive, though). However, I’ve got to admit that camping in Yosemite was the first and only enjoyable camping I’ve done. There are a couple reasons why camping in Yosemite is different than any other camping:
Being closer with ‘nature’ in this sense is unlike anything you’ve done before. We pulled in at night and were unaware that our campsite was flanked by these titan like mountains and cliffs. When you awake in the morning, there will be a soft haze from camp smoke and fog which gives a cinematic feel to the area as the sun slowly creeps above the cliffs and crepuscular rays pierce between the trees. I think this is what people mean when they say camping allows you to connect with nature.
Camping for the sake of camping is one of the reasons I’ve never enjoyed camping. When planning a trip to Yosemite, though, you can save some real time and enjoy more convenience if you decide to camp, whether that means pitching a tent or pulling up in a luxurious RV. This convenience is apparent, when, as soon as the darkness recedes in the morning, you’re able to grab some water and food and hit the trail. It’s literally that fast and easy *if* you camp at Upper Pines Campsite (or Lower Pines, it just require a bit more of a walk). The trailhead to one of the most popular hikes (the Mist Trail) is literally at the campsite. So, then, for the first time, my camping experience was intentional and served a purpose, leaving me more appreciative of the entire experience.

Camping in Yosemite enables awesome amounts of convenience. Here we are, shortly after waking up, ready to hit the trails with very little preparation or wasted time!
The campsites do have bathrooms and running water in the sinks, as well as a water bottle filling station. Your basic needs will be met. There are showers ‘somewhere,’ but not directly at the campsite. I believe you have to make a trek somewhere else if you really want to pamper yourself. Head to www.Recreation.gov if you want to camp - you need to do this well in advance. If you have a choice, choose a site on the perimeter that backs up to the forest rather than another campsite. You’ll enjoy a bit more privacy and likely see some wildlife frolicking around in the morning and evenings (we saw deer and raccoons and zero mountain lions which is absolutely fine with me).
Hiking in Yosemite:
We didn’t hike half dome on this trip to Yosemite. We were limited to only a couple days over Thanksgiving, and the hike isn’t even open that time of year. We have hiked it in the past, though, so we can speak to it a bit. First, you should know that it is a full day hike. We left at sun up and just barely returned to our vehicle at sun down, so maybe you bring a couple head lamps with you just in case. Second, there is a lottery system so that only a select number of folks are actually going up and down Half Dome. The thing is, it’s incredibly steep once you get to the final ascent, and they have wooden boards fixed to the stone as well as chains to hold on to. These are very very necessary, as the rock is slick and a stumble halfway up would result in death or, you know, some serious injuries. Suffice to say, you don’t want thousands of people on this pathway at once.
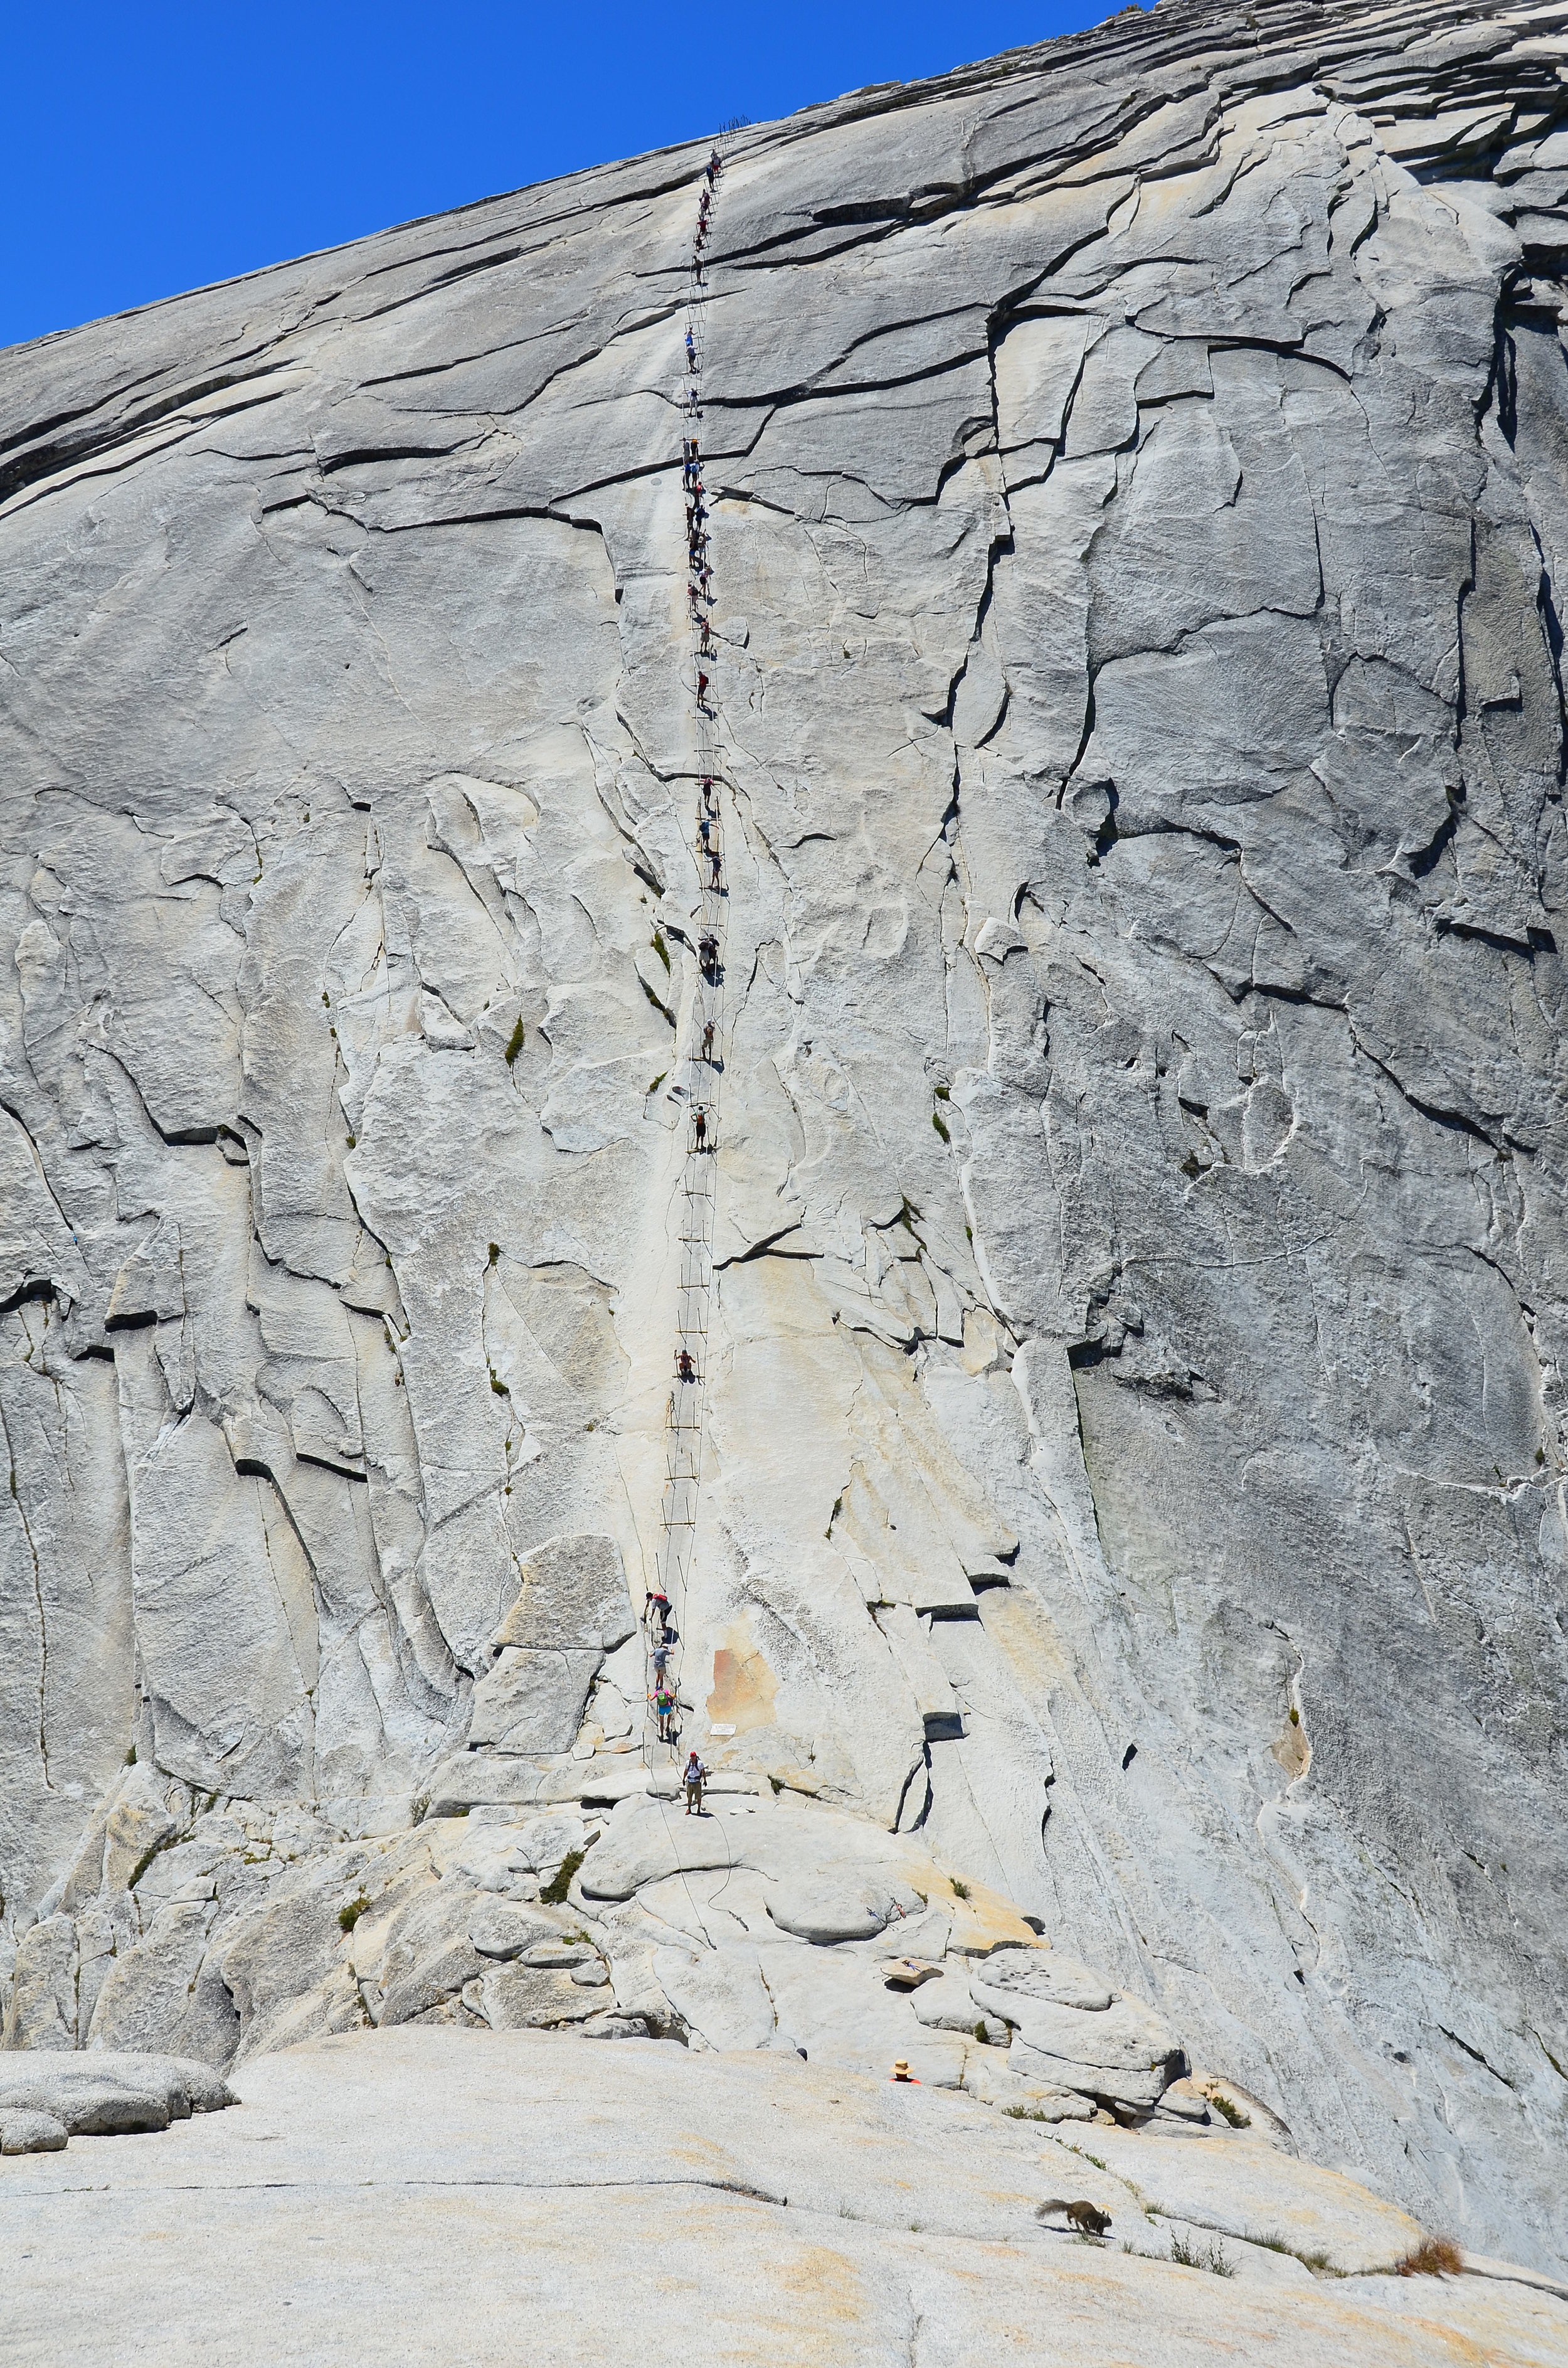
See the line of people going up the cables? Yep, hiking half dome is just as steep as this photo makes it appear.
www.Recreation.gov is also where you’ll apply for your tickets to ascend Half Dome. Check out this site for statistics on applying - the data shows which days are high demand and which are not. It’ll help you plan your trip and increase the chance of getting a ticket. There are pre-season lotteries and then daily lotteries. If you don’t find success in the first you’re going to have to hope for the second.
The bottom line on Half Dome: it’s pretty much the ultimate hike in Yosemite, in my opinion. If you can get a ticket, go for it! It’s truly awesome. If you’re somewhat fit, it won’t be a problem, but for those of us that tend to spend more time on the couch than on mountains, a bit of training might be prudent.
Bridal Veil & Lower Yosemite Falls

Lower Yosemite Falls has this fallen tree directly in front of it. It's perfect for portrait photos with an epic background. Caution: years of folks sitting on this tree has smoothed the top to the point that it is literally as slick as ice. Many jump up with too much haste and end up sliding directly over and off.
The hike to both of these falls is mostly flat. You'll be on paved paths with a couple shops along the way and be treated to very scenic forests as you approach these waterfalls. We've included them together because they are similar, but they are slightly offset from one another in regards to their location in the valley. If you've spent the majority of your day on something else and don't have time for an aggressive hike, you can tackle these two in 2-3 hours (probably less) and not have to worry about being exhausted at the end of your day. Both hikes are ideal as a warm up as well.
The Mist Trail - more bang for your buck!
The Mist Trail is my favorite trail because it is initially pretty challenging and treats you to two of the best waterfalls in Yosemite in the first 2-4 hours of hiking. After that, it mellows out a bit. It’s also a trail you can choose to head to Half Dome, so you’re really getting your money’s worth if you scored a ticket.

Vernal Falls has a stone staircase winding up directly beside it. If the flow of the waterfall is heavy, you will be soaked without a poncho! This is the waterfall at a relatively calm state.
The first waterfall is Vernal Falls. You’ll catch a glimpse of it long before you get to it at a bridge crossing. Fair warning here: in the summer, you may want to bring a poncho (link). It’s called the Mist Trail for a reason! As you approach and pass the waterfall, there are stone stairs that may be wet and slippery during some seasons, depending on snowmelt and the volume of the waterfall. Honestly, I can imagine how they would be treacherous for some folks with bad knees, especially on the way down. Reference the video if you want to see what we’re talking about.
The second waterfall you’ll approach is Nevada Falls. Equally as stunning, the trail doesn’t take you as close as Vernal, but you’ll get some good views if you go off path. Being the more risk taking group that we are, we jumped completely off path and scrambled over/under/between house sized boulders to get to the base of the waterfall. Again, reference the video and know that this scrambling probably isn’t for the faint of heart, however, we rarely stay on the path in front of us. We were treated with an up close look at the waterfall and really being able to feel its power. If you aren’t continuing to half dome, you can pretty much turn back after this waterfall. After you ascend past it, the trail becomes less steep and shoots across an upper valley before beginning the switchbacks that take you to Half Dome.

Nevada Falls is the second waterfall you will encounter on the Mist Trail in Yosemite. You can get this view right near the trail, but if you scramble on the black boulders at the foot of the fall, you can get an even better view. Check the video to see exactly what we're talking about.
Giant Sequoia Trees

This giant sequoia tree was carved to allow traffic (yep, cars, buggies, etc) to drive directly through it.
Yes, they tunneled directly through one of these trees so that wagons, and later, cars, could drive through - that’s how enormous they are. You can no longer drive through said tree, as it’s now a footpath, but it is surely a sight to see. There are several groves throughout the park that contain these ancient flora. Mariposa Grove is probably the best, so that’s where I’d head. You’ll be doing a bit of driving (30-35 min) from the valley to get to the groves, but it makes for an easy hike that’s perfect for a picnic as well. Make sure you read some of the facts about these trees - my guess at how old they were and their history was completely wrong.
Glacier Point at Yosemite
Glacier Point is probably the best way to begin or end your trip to Yosemite. It could take up to an hour to get to from the valley, so I just don’t see a good reason to do it in the middle of your trip. You get a true overlook of the entire park and you can just imagine the glaciers cutting through and shaping the beauty that now remains. Going first thing really gives you that initial “Wow” feeling and gets you excited for the adventures that lay ahead. Going last, however, gives you a different perspective on what you did while hiking. You can see both Vernal and Nevada Falls, so you can literally trace what route you took from this vantage point and imagine the tiny people below that are on the same hike you previously took. I therefore think that making it your last venture of the trip is appropriate and leaves you with a sense of accomplishment when you get to see what you did from such an elevation.
Gear for Yosemite
The gear you’ll need for Yosemite really depends on what you’re going to be doing. Camping requires a tent, obviously. If you have knees with a bit of wear and tear, you’ll maybe want some hiking poles (I kind of wish I’d had a pair on my last visit). Below I’ve laid out some basic gear that you may or may not have, but we either used it or wish we’d had it.